Friday, September 29, 2023
Rolux Reel mower from gas motor to battery power conversion
This will show how I changed my Rolux X20 reel mower from a gasoline motor to a battery motor. Ask any question you might have as well. The first thing you may want to choose is what battery or batteries you want to use. I already have the 60V Greenworks stuff so I figure that is what I would use. I wanted a battery motor with plenty of power so not to over work it. I chosed a motor that was advertised for 48-60V, 1800 watts with an RPM of @4500. here is the one I bought off Amazon. The wiring takes some time to figure out. the important wires are the off/on, which is the red/orange, the throttle red/black/brown, reverse brown/black, 3speed blue/black/yellow, and the power wires red/black (heavy wires) and the phase wires yellow/blue/green (all heavy wires). My motor came turning the wrong direction so i had to swap one of the heavy blue wires with the yellow and then the smaller wires from the throttle you need to switch one of the yellow with the green. if you just use the reveres switch you would find the speed is very slow, so you need to change the phase wires.
Here is a list of the other parts I used and will provide a video exsplaining the build.
motor coupling,
pillow block bearing,
thumb throttle,
wire box/junction bar,
volt meter,
8"x8" weather proof box, the
tachometer, throttle cable stops, throttle cable adjuster, voltage reducer (not needed if you dont install the tachometer), ABS plastic to make the cover, wire connector kit, aluminium stock, 3 speed switch, On/off switch, Forward/reverse switch, 30 Amp fuse.
The sq tubing I have under motor is 2"x2" metal that I had pieces left over from a fence project and its the perfect height to mount the motor to. The metal sq tubing under the pilliow block was also some scrap and used washers to adjust it to the proper height.
:
OTHER MOTOR OPTIONS: 60V 2000W Amazon Greenworks 60v 5 ah battery Off brand 60v 5 ah battery Greenworks charger (need two one to charge and one to gut out and make a battery holder).
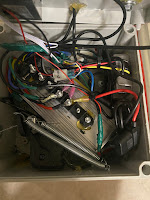
Now a look inside the box: In the first picture you see I placed a piece of foam to protect the bus bar from any shorting of the terrminals. The second picture you can see the controller on the bottom, the bus bar is hot glued to the top of it. On the right side is the 60v to 12v transformer to power the tachometer. Also on the right side is a 30amp fuse installed on the positive power wite from the battery. On the bottom you will see the thumb throttle. Its spring loaded to the left (off) so I had to add some springsto pull the throttle open. Then the throttle cable that came with the mower is used to pull it closed. The throttle is attached to the box with bolt and nut and washers. used hot glue gun to seal it up. I trimed the spring to get the right tension. I drilled a small hole in the throttle to attach the spring to and then drilled small hole in the side of the box and used a small cotter pin to anchor it, and glued the flatten pins on the outside with the hot glue. Picture of outside of the box. Here is a pucture of the cable adjuster for the throttle. Here is a close up of the Tachometer and the magnet which I drilled a small hole into the coupling to hot glue it into. The important thing I learned is it will only work with one side of the magnet. To figure out which side you need to use, power up the tach with the 12v and hold the magnet in front of the pick up. If the led light on the back of it lights up you got the right side, if not flip the magnet over and it should light up and this is the side you want. Just hot glue it in hole you drilled as in the picture. Here is a video of the mower running. A lot less noise and no vibration like the gas motor gives. ( the grass looks bad as its just recovering from water restrictions for 3 months)
Subscribe to:
Comments (Atom)


